Read More: The Professional High Quality Mobile Phone Reapir Tool
The Reason of cannot connect the WiFi on iPhone 6.< /b>
What causes Wi-Fi problems on iPhone? There are many reasons to cause the iPhone 6 cannot the WiFi after installing software updates. The simple reason, such as enabled Airplane mode, or the fact your iPhone is too far from the router. The signal can be poor at times, which is why your connection can be slow. A software bug can also be one of the reasons, as well as the issues with network devices (modem and router), or the iPhones antenna.
Some short ways to solve the WiFi problem.
1. Turn Off the Wi-Fi Button And Back On.
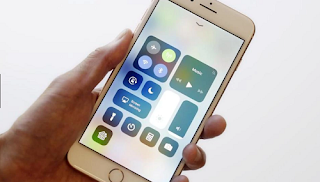
If your iPhone wont connect to a Wi-Fi network or if it does connect but the connection drops, start with some simple things before you confirm that the iPhone WiFi chip is not damaged. If you havent tried it already â€" turn Wi-Fi off and back on. You can swipe from the bottom edge of the screen and open the control center. Tap on the Wi-Fi icon to turn it off. Wait for a couple of seconds and tap the icon again to turn the Wi-Fi back on.
Another way to turn Wi-Fi off/on is through iPhone settings. Go to Settings > Wi-Fi, and toggle the switch next to Wi-Fi.
2. Turn Off The Bluetooth.
Bluetooth can be of the reasons why your iPhone wont stay connected to wifi network or wont connect at all because the Bluetooth can cause interference with Wi-Fi connections. That is why you should turn it off to see if that will make any difference. You can either swipe up from the bottom edge of the screen and tap on the Bluetooth icon, or you can go to Settings > General, and turn it off.
3. Toggle Airplane Mode.
When we discussed some of the reasons why your iPhone or iPad wont connect to Wi-Fi, we mentioned the Airplane mode. If it is turned on, thats why the device wont connect to the network. As soon as you turn it off, the problem will be solved.
Toggling the Airplane mode can be pretty effective and it can help you fix the problem. Go to Settings and turn the Airplane mode on. Wait for 30 seconds and turn it back off. Try to connect to a Wi-Fi network again.
4. Reboot your iPhone.
A restart can be a very effective solution if your iPhone cannot connect to a wifi network. To restart, press and hold the Sleep/Wake (Power) button until you see the red slider. Next, drag the slider to power off your device completely. After a few seconds, press and hold the iPhone Sleep/Wake button again until the Apple logo appears. This process wont affect any data stored on your device, thus its safe.
Alternatively, you can force your iPhone to restart instead. To force restart your device, hold down the Sleep/Wake (Power) and the Home buttons simultaneously for about 10 seconds until the Apple l ogo shows up on screen.

5. Forget Wi-Fi Network and Reconnect.
It is also possible that the update overrides or nullifies existing network settings and the reason why you can no longer connect to your Wi-Fi network with the current settings. In this case, forgetting Wi-Fi network may likely be the best option.
6. Disable Location services for Wi-Fi Networking.
Turning this feature off will not disable Wi-Fi completely. Only those location services that are being used for wireless networking will be disabled. Other users said theyve managed to fix the problem and get connected to their Wi-Fi network again after disabling Wi-Fi networking services on their iPhones. So you might as well want to give it a try and see how it does on your end. Heres how:
Go to your iPhone Settings.
Tap Privacy.
Tap on Location Services.
Select System Services.
Toggle the switch next to Wi-Fi Networking to turn the feature OFF.
Try to connect to your Wi-Fi network with Wi-Fi network services turned off.
7. Update Router Firmware.
If your iPhone wont connect to Wi-Fi home network, maybe updating the router firmware will fix the problem. The first thing you need to do is find the model and version number of your router. You can find these info on the box of the device or in the manual. Also, the model and version number are usually located on the router itself, on its backside or underside. Go to the manufacturers official website, and look for the Download section. Find your router, and download and install the firmware. If you are not sure how to do this, you will find the guide on the manufacturers website.
8. Set Custom DNS.
Try altering the current DNS server settings on your iPhone. If you are willing to try it now, take note of your current DNS settings before you start making changes. That way, you can always revert it back to the original settings should the alteration wont do any good at all. To those who dont know how, heres how to change the DNS settings on your iPhone:
Go to Settings.
Tap on the Wi-Fi menu.
Locate your Wi-Fi network from the list of available networks and then tap the information (i) icon next to it.
Scroll down to the DNS section.
Tap on the numbers next to DNS to change them.
From the keyboard, enter the new DNS server address.
More information about phone repair tools and guides, you can choose Vip Fix Shop Team.
No comments:
Post a Comment