Do you know what happen after Deauthorize Mac or PC? Through that you remove the ability to play content that you bought from iTunes Store. And yeah don’t worries you won’t lose nothing likewise content or nothing will be deleted. As well as it’s allowed to you make authorization again. Just by follow these steps for Mac or PC
For, several things you must remove your authorization from your Mac Such as to sell it or Give it away, Send it give for services or before Make major Upgrades. Useful tips for Mac OS X Yosemite.
Would you want to see how many computer you’ve authorized. You can see through below given steps.
In The iTunes Store > Select Account from the drop down menu > in the A pple ID Summary section > next to Computer Authorization > you’ll see the number of Computers that you’ve authorized.
Steps to Deauthorize Mac or Computer
Step 1. Open iTunes on that computer or Mac you want to deauthorized
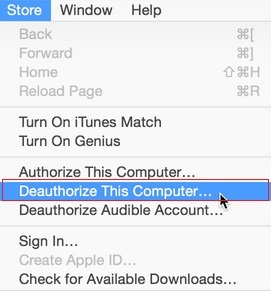
Step 2. Now, Choose Store
Step 3. Select Deauthorized This Computer
Step 4. Next, you’ve to enter your Apple ID.
Step 5. After log-in, click on Deauthorize.
How to Deauthorize Mac from iTunes Store
That’s it. If you need to deauthorize your computer/ Mac but you can’t access it, in that case you need to deautorized all computers. Let’s after you authorized 2 computers through your Apple ID, then you’ve get freedom and you’ve the option to deauthorized all computer once per year.
Step for How to Deautorized all computers easily
You’ve to need open iTunes store on one of your Authorized computer then follow below listed steps.
Step 1. Click on iTunes Store
Step 2. Sign in. Enter your Apple ID and Password
Step 3. Now, Click Deauthorized All.
Option Deauthorized All appears if and only if you have more than 2 Computer Authorized. If you don’t have see the Deauthorized All button, then it’s give you a proof you’ve only one Authorized Computer. Deauthorize Mac successfully. This is the compatible tips with MacBook Pro, MacBook Air, iMac etc.
No comments:
Post a Comment